> ## Documentation Index
> Fetch the complete documentation index at: https://connect.watson-orchestrate.ibm.com/llms.txt
> Use this file to discover all available pages before exploring further.
# Native Agent Onboarding
## Overview
Native agents are built and deployed directly within watsonx Orchestrate. They use IBM-managed models, tools, and runtime. Native agents can call tools, use external agents as collaborators, and be chatted with directly by end-users.
This guide walks you through building, validating, packaging, and listing a native agent in the watsonx Orchestrate Agent Catalog using the Agent Development Kit (ADK).
**Catalog onboarding limitations**: We currently don't support onboarding certain native agent components and tools into the Catalog, including Knowledge, Flows, Model Gateway, OpenAPI Tools, and Langflow Tools. The team is actively working on expanding this capability, so stay tuned — we'll announce updates as soon as these become available.
Note that these components are fully supported by the watsonx Orchestrate platform for your own use; this limitation applies only to catalog onboarding for partner distribution.
## Prerequisites
Before you begin, ensure you have:
* Access to a watsonx Orchestrate environment
* The [Agent Development Kit (ADK) ](https://developer.watson-orchestrate.ibm.com/) installed
* Python 3.8 or higher (for building tools)
* An SVG icon for your agent (square, 64-100px, max 200KB)
**App ID Required**: Native agents with custom tools require a unique App ID issued by IBM. This identifier is essential for your agent's integration within the watsonx Orchestrate ecosystem. IBM will generate and provide your App ID during the onboarding process BEFORE submission. The app\_id will be embedded in the code itself that is part of the submission.
## Steps to create and list your native agent
Follow the instructions in the [Getting started with the ADK ](https://developer.watson-orchestrate.ibm.com/getting_started/installing) to:
1. Install the Agent Development Kit
2. Connect it to your watsonx Orchestrate environment
3. Configure your credentials
Build your native agent following the [Getting started with the ADK ](https://developer.watson-orchestrate.ibm.com/getting_started/installing) tutorial.
To learn more about native agent capabilities, see [Authoring agents ](https://developer.watson-orchestrate.ibm.com/agents/build_agent).
**Key components of a native agent:**
* **LLM selection**: Choose from IBM-managed models (e.g., Granite, Llama)
* **Instructions**: Define your agent's behavior and personality
* **Tools**: Add capabilities through Python or OpenAPI tools
* **Collaborators**: Connect to external agents for specialized tasks
Native agents can call tools to perform tasks. Define tools as Python or YAML (OpenAPI) files.
```python search_healthcare.py theme={null}
from typing import List
import requests
from pydantic import BaseModel, Field
from enum import Enum
from ibm_watsonx_orchestrate.agent_builder.tools import tool
class ContactInformation(BaseModel):
phone: str
email: str
class HealthcareSpeciality(str, Enum):
GENERAL_MEDICINE = 'General Medicine'
CARDIOLOGY = 'Cardiology'
PEDIATRICS = 'Pediatrics'
ORTHOPEDICS = 'Orthopedics'
ENT = 'Ear, Nose and Throat'
MULTI_SPECIALTY = 'Multi-specialty'
class HealthcareProvider(BaseModel):
provider_id: str = Field(None, description="The unique identifier of the provider")
name: str = Field(None, description="The providers name")
provider_type: str = Field(None, description="Type of provider")
specialty: HealthcareSpeciality = Field(None, description="Medical speciality")
address: str = Field(None, description="The address of the provider")
contact: ContactInformation = Field(None, description="Contact information")
@tool
def search_healthcare_providers(
location: str,
specialty: HealthcareSpeciality = HealthcareSpeciality.GENERAL_MEDICINE
) -> List[HealthcareProvider]:
"""
Retrieve healthcare providers based on location and specialty.
Args:
location: Geographic location (city, state, zip code)
specialty: Medical specialty to filter by
Returns:
A list of healthcare providers
"""
resp = requests.get(
'https://find-provider.example.com',
params={'location': location, 'speciality': specialty}
)
resp.raise_for_status()
return resp.json()['providers']
```
```yaml search_healthcare.yaml theme={null}
servers:
- url: https://find-provider.example.com
paths:
/:
get:
operationId: getHealthCareProviders
summary: Gets a list of healthcare providers
parameters:
- in: query
name: location
schema:
type: string
description: The city, state or zipcode
- in: query
name: speciality
schema:
type: string
enum: ["General Medicine", "Cardiology", "Pediatrics", "Orthopedics", "ENT", "Multi-specialty"]
description: The speciality of the healthcare provider
responses:
'200':
description: Successfully retrieved list
content:
application/json:
schema:
type: object
properties:
providers:
type: array
items:
type: object
```
To learn more about tools, see [Overview of Tools ](https://developer.watson-orchestrate.ibm.com/tools/overview).
Import your agent into your draft environment:
```bash theme={null}
orchestrate agents import -f my_native_agent.yaml
```
For more information, see [Importing/Deploying agents ](https://developer.watson-orchestrate.ibm.com/agents/import_agent).
**Option 1: Test in watsonx Orchestrate UI**
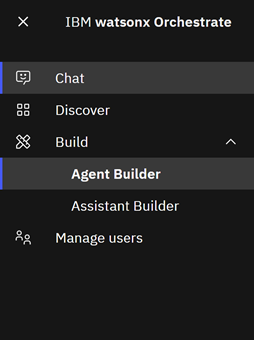
1. Log in to your watsonx Orchestrate instance and open the **Agent Builder**:
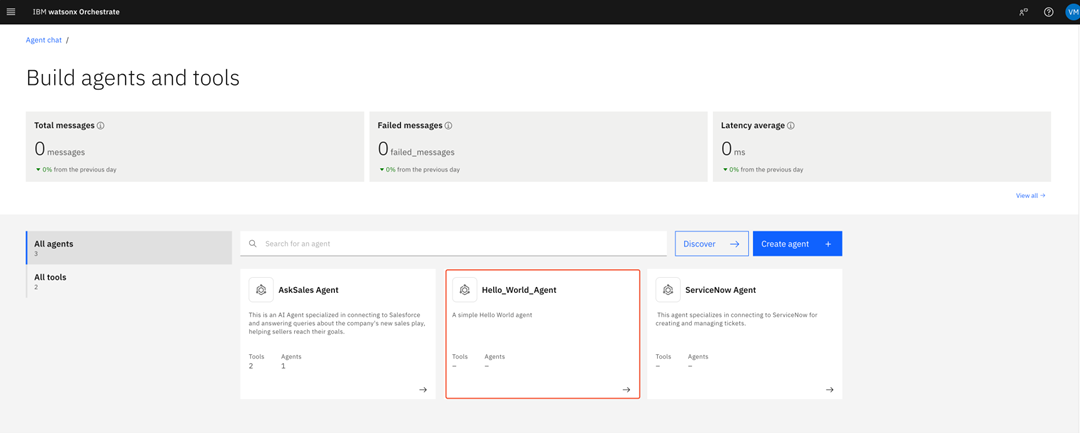
2. In the **Build agents and tools** page, select your agent:
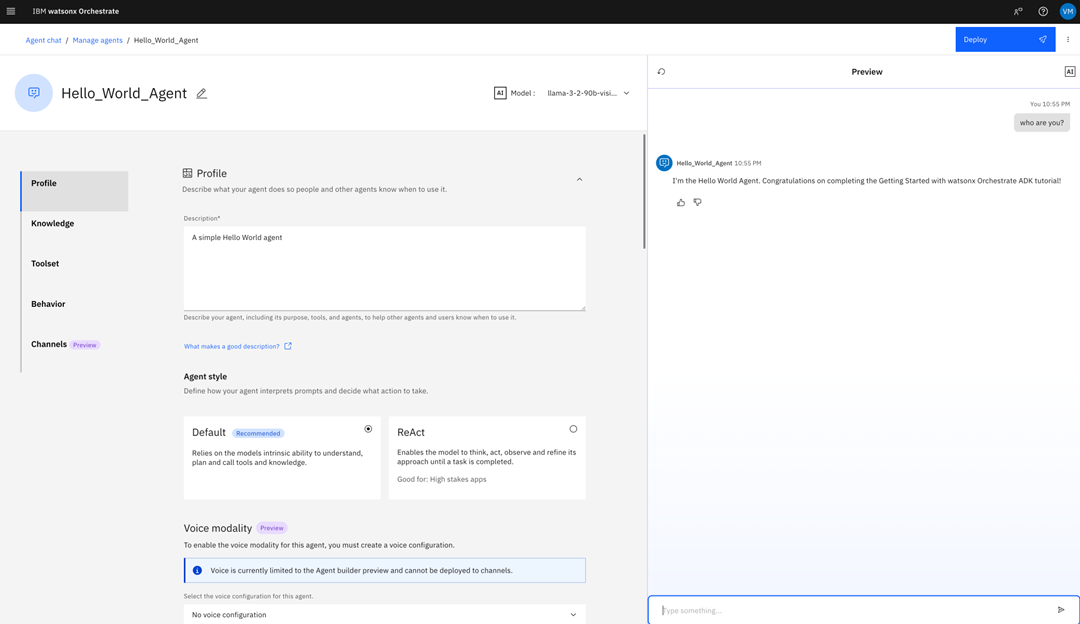
3. Use the test chat to verify your agent's behavior:
**Option 2: Test with watsonx Orchestrate Developer Edition**
If you have [installed watsonx Orchestrate Developer Edition ](https://developer.watson-orchestrate.ibm.com/developer_edition/wxOde_setup), use the ADK command line:
```bash theme={null}
orchestrate chat start
```
To install watsonx Orchestrate Developer Edition, you need a valid license. You can obtain a license by:
* Purchasing a license for watsonx Orchestrate SaaS (on AWS or IBM Cloud)
* Contacting the IBM sales department to purchase the Developer Edition exclusively
Create a comprehensive TSV test file with AT LEAST THREE prompts and expected outputs:
```txt test.tsv theme={null}
You are Jane Doe in the US. What holiday is on 06/13/2025? National Sewing Machine Day
What is the capital of France? Paris
```
**Important**: This TSV file is required for IBM validation and must be included in your submission package.
Run validation with ADK:
```bash theme={null}
orchestrate evaluations validate-native \
-t ./evaluations/test.tsv \
-o ./evaluations/output
```
This generates an evaluation results archive containing:
* `test.tsv` - your original test file
* `validation_results.json` - detailed pass/fail logs
* `summary_metrics.csv` - aggregate metrics
**Submit your TSV file:**
* Include in your package under `evaluations/`
* Email a copy to: **[IBMAgentConnect@ibm.com](mailto:IBMAgentConnect@ibm.com)** with subject "TSV Validation - \[Agent Name]"
For more information, see [Validating your agent](../evaluate/evaluate).
Create a packaging workspace for your offering:
```bash theme={null}
orchestrate partners offering create \
--offering my_offering \
--publisher partner_company \
--type native \
--agent-name my_native_agent
```
This command creates a folder structure:
```
my_offering/
├── agents/ # Your agent definition(s)
│ └── my_native_agent.json
├── connections/ # (Optional) Connection definitions
│ └── my_connections.json
├── offerings/ # Top-level offering metadata
│ └── my_offering.json
├── tools/ # (Optional) Custom tools
│ └── ...
└── evaluations/ # Validation artifacts (you add these next)
└── my_native_agent_eval.zip
```
**Folder contents:**
* `agents/`: Your agent JSON file with required metadata (publisher, tags, icon, etc.)
* `connections/` (optional): Credential or endpoint definitions
* `offerings/`: Offering identity and type metadata
* `tools/` (optional): Tool definitions
* `evaluations/`: Validation results from Step 6
Copy your evaluation results archive into the `evaluations/` folder:
```bash theme={null}
cp ./evaluations/output/my_native_agent_eval.zip ./my_offering/evaluations/
```
These artifacts prove your agent behaves correctly and are required for IBM onboarding review.
Before packaging, ensure your agent configuration file (`config.json`) has all required fields:
```json config.json theme={null}
{
"spec_version": "v1",
"kind": "native",
"name": "my_native_agent",
"display_name": "My Native Agent",
"llm": "groq/openai/gpt-oss-120b",
"style": "default",
"description": "Your agent description",
"instructions": "Your agent instructions",
"tags": ["Sales", "Productivity"],
"publisher": "Your Company Name",
"language_support": ["English"],
"icon": "",
"category": "agent",
"restrictions": "editable",
"hidden": false,
"version": "1.0.0",
"change_log": ["Initial release"],
"related_links": [
{
"key": "support",
"value": "https://your-support-url.com",
"type": "hyperlink"
},
{
"key": "documentation",
"value": "https://your-docs-url.com",
"type": "hyperlink"
},
{
"key": "terms_and_conditions",
"value": "https://your-terms-url.com",
"type": "hyperlink"
}
],
"agent_role": "collaborator",
"delete_by": null,
"channels": ["Teams", "WhatsAppTwilio", "FacebookMessenger", "GenesysConnector", "Slack"],
"part_number": {
"aws": null,
"ibmcloud": "your_part_number",
"cp4d": null
},
"scope": {
"form_factor": {
"aws": "free",
"ibmcloud": "paid",
"cp4d": "free"
}
},
"tools": [],
"collaborators": []
}
```
The specification version. Use `v1`.
The type of agent. For native agents, use `native`.
The unique identifier for your agent. Use lowercase with underscores (e.g., `my_native_agent`).
Human-readable name for your agent that will be shown in the UI (e.g., "My Native Agent").
The language model to use for your agent (e.g., `groq/openai/gpt-oss-120b`).
The agent's interaction style. Use `default` or `react`.
A brief description of what your agent does. This will be displayed in the catalog.
Detailed instructions that define your agent's behavior, personality, and how it should respond to user queries.
The version number of your agent (e.g., `1.0.0`). Must be incremented for each update.
Categories for catalog organization. Use existing catalog categories like `Sales`, `Productivity`, `IT`, `Security`, `Compliance`, etc.
Your company or organization name (e.g., "Your Company Name").
List of supported languages (e.g., `English`, `French`, `Spanish`, `Japanese`).
Inline SVG string for your agent's icon. Must be square, 64-100px, max 200KB.
The catalog category. Always use `agent` for agents. Do not edit this field.
Defines how users can modify the agent. Options: `editable`, `non-editable`, or `custom`.
Set to `true` to hide the agent from the catalog, `false` to make it visible. Default is `false`.
Version history describing changes in each release (e.g., `["Initial release", "Added new features"]`).
Array of related links for support, documentation, and terms. Each link object contains:
* `key`: Link label (e.g., `support`, `documentation`, `terms_and_conditions`)
* `value`: URL string
* `type`: Always use `hyperlink`
The role of the agent. Always use `collaborator`. Do not edit this field.
Deletion timestamp. Always use `null`. Do not edit this field.
List of supported communication channels. Options include: `Teams`, `WhatsAppTwilio`, `FacebookMessenger`, `GenesysConnector`, `Slack`.
Platform-specific part numbers for billing and provisioning. Contains:
* `aws`: Part number for AWS deployments (or `null`)
* `ibmcloud`: Part number for IBM Cloud deployments
* `cp4d`: Part number for Cloud Pak for Data deployments (or `null`)
Defines the pricing model per platform. Contains `form_factor` object with:
* `aws`: Pricing model for AWS (`free` or `paid`)
* `ibmcloud`: Pricing model for IBM Cloud (`free` or `paid`)
* `cp4d`: Pricing model for Cloud Pak for Data (`free` or `paid`)
Array of tool definitions that your agent can use. Can be empty `[]` if no tools are needed.
Array of external agents that this agent can collaborate with. Can be empty `[]` if no collaborators are needed.
Package everything into a distributable ZIP:
```bash theme={null}
orchestrate partners offering package \
--offering my_offering \
--folder .
```
This command:
* Validates folder structure and required files
* Bundles artifacts into a portable archive
* Outputs a versioned package (e.g., `my_offering-1.0.zip`)
The ZIP contains:
* `agents/` - your agent definitions with metadata
* `offerings/` - top-level metadata
* `connections/` - if defined
* `tools/` - if defined
* `evaluations/` - validation results
Submit your packaged agent through the IBM Concierge app:
1. Log in to the **IBM Concierge** app.
2. Navigate to **My AI products** → **Agent**.
3. Select **Native** as the agent type.
4. Upload your package file (`my_offering-1.0.zip`).
5. Check the fields from the **Agent details** form. The form should reflect the values from your package file.
6. Click **Save** once you are ready to submit your package.
7. Scroll to the top of the page and click **Request approval**.
8. Select the deployment version, check the box **I confirm that my company is authorized to use all materials**, and click **Request approval**.
## What happens next
After submission:
1. **IBM review**: The IBM onboarding team validates your package structure, metadata, and evaluation results.
2. **Approval**: Once approved, your agent is published to the watsonx Orchestrate Agent Catalog.
3. **Availability**: Users can discover and provision your agent into their environments.
4. **Updates**: To update your agent, increment the version number, repackage, and resubmit through the IBM Concierge app.
## Need help?
* Review the [ADK documentation ](https://developer.watson-orchestrate.ibm.com/)
* Check the [Authoring agents guide ](https://developer.watson-orchestrate.ibm.com/agents/build_agent)
* See [Tools overview ](https://developer.watson-orchestrate.ibm.com/tools/overview)
* Email questions to: **[IBMAgentConnect@ibm.com](mailto:IBMAgentConnect@ibm.com)**
* Contact [IBM Support](https://ibm.com/mysupport) for technical assistance
 2. In the **Build agents and tools** page, select your agent:
 3. Use the test chat to verify your agent's behavior:
 **Option 2: Test with watsonx Orchestrate Developer Edition**
If you have [installed watsonx Orchestrate Developer Edition
**Option 2: Test with watsonx Orchestrate Developer Edition**
If you have [installed watsonx Orchestrate Developer Edition 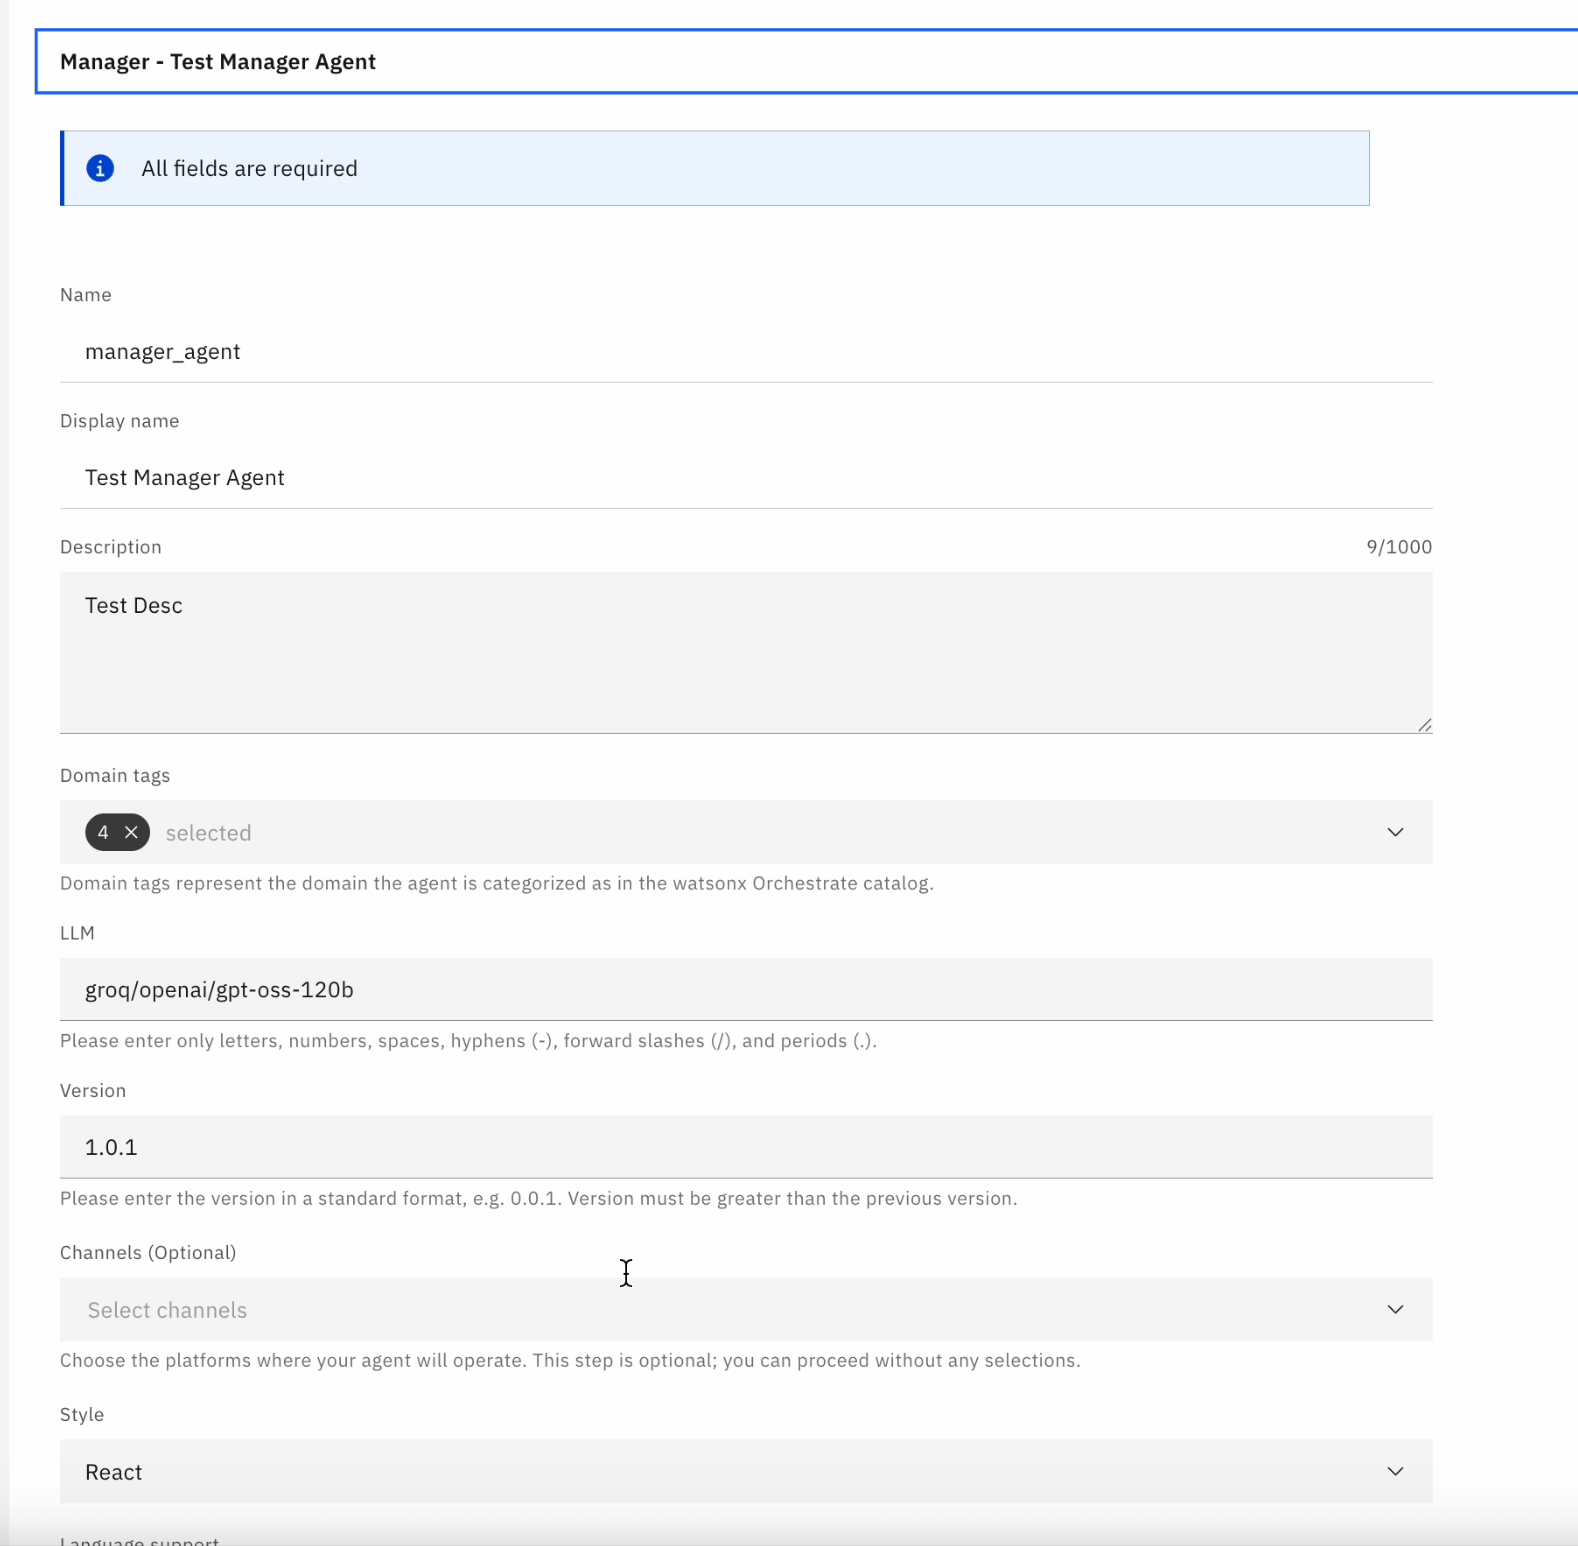 6. Click **Save** once you are ready to submit your package.
7. Scroll to the top of the page and click **Request approval**.
8. Select the deployment version, check the box **I confirm that my company is authorized to use all materials**, and click **Request approval**.
6. Click **Save** once you are ready to submit your package.
7. Scroll to the top of the page and click **Request approval**.
8. Select the deployment version, check the box **I confirm that my company is authorized to use all materials**, and click **Request approval**.